Canon Printer Filter Failed on Chromebook – How To Fix 2023
Printing is a common and often essential task for many Chromebook users. Sometimes, it’s easy, but there can be problems. One problem is when Chromebook users get a ‘Filter Failed’ error while trying to print with a Canon printer.
Canon Printer ‘Filter Failed’ on Chromebook can happen due to document size exceeding printer capacity, low-end printer issues, driver compatibility, software conflicts, incorrect settings, or outdated software.
Now, we will look deeply into the causes of this error, provide effective solutions to rectify it, and extend our discussion to address similar issues that may arise with other printer brands. So, stick with us till the end!
What Does “Filter Failed” Mean on a Printer on Chrome? – For Beginners!
The mysterious “Filter Failed” error message you see on your Canon printer while using a Chromebook is a straightforward sign that your printing task didn’t succeed because of issues with the print filters.
So, Print filters are essential software parts that handle the interpretation and processing of print data before sending it to the printer. When these filters encounter errors or compatibility problems, they promptly notify you with the “Filter Failed” message. Now, let’s examine the reasons behind the Filter Failed error on Chromebook.
Why Is My Canon Printer Showing “Filter Failed” On Chromebook? – Take Analysis!
- Driver Compatibility:
If the printer driver installed on your Chromebook doesn’t work well with the format of your print job, it can make the filters fail. So, it’s really important to ensure that you have the latest Canon printer driver that’s designed to work smoothly with your Chromebook’s operating system.
- Software Conflicts:
When there are conflicts between the printing system in your Chromebook and the software in your printer, it can trigger filter failures. So, It’s crucial to find and fix these conflicts to get your printing back on track.
- Incorrect Settings:
Sometimes, the trouble lies in the settings you’ve chosen for your print job. Things like using the wrong paper size, print quality, or layout settings can cause filter errors. So, carefully double-check your print settings to make sure they match the paper type, size, and other details accurately.
- Outdated Software:
Using outdated printer drivers or firmware can lead to compatibility problems, which, in turn, can result in filter failures. So, it’s absolutely essential to keep your Canon printer’s software up-to-date by regularly updating the firmware.
Moreover, these are some reasons the filter failed error shows on Chromebook. If your Chromebook displays this error, don’t worry. Just scroll down to find out how to fix the Filter Failed error.
How To Fix Filter Failed On Chromebook? – Let’s Embark On An Exploration!
1. Reinstall the Printer’s Driver:
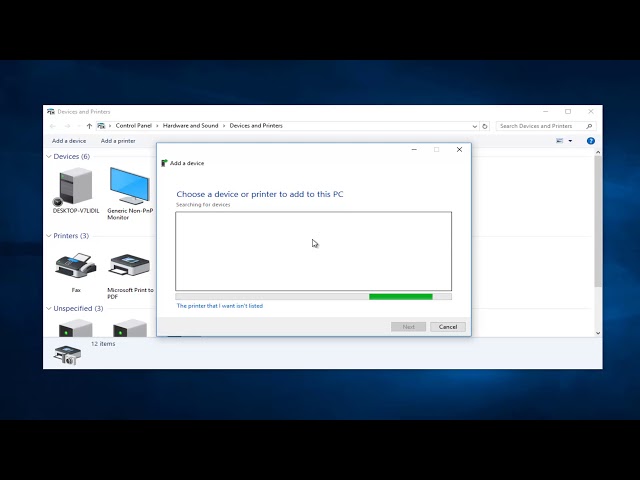
- Begin by removing the existing printer setup from your Chromebook.
- Next, visit the official Canon website and download the latest Canon printer driver that is compatible with your Chromebook’s operating system.
- After downloading, reinstall the printer and configure it with the newly acquired driver.
2. Enable Sharing Mode:
- Access your Canon printer’s settings on your Chromebook.
- Enable “Sharing Mode” to facilitate seamless communication between your Chromebook and the printer.
3. Adjust the Paper Setting:
- Open your print dialog and meticulously double-check the paper size and type settings.
- Confirm that these settings precisely match the physical paper loaded in the printer.
4. Reboot the Printer:
- Power off your Canon printer.
- Unplug the printer from the power source and allow it to remain disconnected for a few minutes.
- Reconnect the printer to the power source and power it on.
So, follow these steps to sail smoothly through the troubleshooting process and get back to hassle-free printing. For more information, click on the forum link.
Different Printer Filter Failed Errors On Chromebook – Essential Inform!
1. HP Printer Displaying Filter Failed Error on Chromebook:

If you are using an HP printer and encounter the “Filter Failed” error on your Chromebook, follow these steps to troubleshoot the issue:
- Check Printer Connection: Ensure that your HP printer is properly connected to your Chromebook via USB or Wi-Fi. A loose or unstable connection can lead to printing errors.
- Update Printer Driver: Make sure that your HP printer’s driver is up-to-date. Outdated drivers can cause compatibility issues with Chrome OS.
- Verify Print Settings: Double-check your print settings to ensure they are configured correctly. Ensure that you have selected the right printer, paper size, and print quality options.
- Clear Print Queue: Sometimes, a stuck print job in the queue can trigger errors. Open the Chromebook’s print queue and cancel any pending print jobs.
- Reinstall Printer: If the issue persists, try removing the HP printer from your Chromebook and then reinstalling it. Go to ‘Settings’ > ‘Printers’ > ‘Manage Printers’ to remove and re-add the printer.
2. Brother Printer Displaying Filter Failed Error on Chromebook:
Users of Brother printers may also encounter the “Filter Failed” error. In order to address this problem, please follow these instructions:
- Check Printer Compatibility: Ensure that your Brother printer model is compatible with Chrome OS. Visit the Brother website to verify if there are Chrome OS drivers available for your printer.
- Update Printer Driver: If Chrome OS drivers are available, download and install the latest driver for your Brother printer.
- Review Print Settings: Carefully review your print settings to make sure they are configured correctly. Check for any conflicting settings that may be causing the error.
3. Epson Printer Displaying Filter Failed Error on Chromebook:
Epson printer users can also encounter the “Filter Failed” error. To resolve this problem, follow these instructions:
- Update Printer Drivers: Ensure that you have the most recent Epson printer drivers installed on your Chromebook. You can typically find these drivers on the Epson website.
- Verify Print Settings: Check your print settings to ensure they match the type of document you are trying to print. Ensure the paper size, orientation, and other settings are correct.
- Check for Firmware Updates: Some Epson printers may require firmware updates for compatibility with Chrome OS. Visit the Epson support website to see if any updates are available for your printer.
Therefore, by adhering to the troubleshooting guidelines tailored to your printer model, you can frequently rectify this issue and experience seamless printing from your Chromebook.
How to Reset Your Canon Printer After Error? – Take A Look Here!
1. Consult Your Printer Manual:
Locate your printer’s manual. It’s typically provided when you purchase the printer. If you can’t find the physical manual, you can often find a digital version on the Canon website by searching for your printer model.
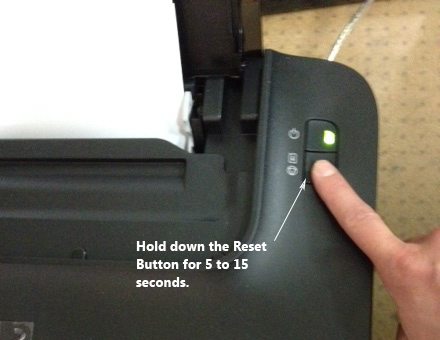
2. Identify the Reset Process:
In your printer’s manual, look for a section that discusses resetting or restoring the printer to its default settings. This section will provide step-by-step instructions specific to your printer model.
- Power Off Your Printer:
Before initiating the reset process, ensure that your printer is powered off. If it’s currently on, turn it off by pressing the power button.
- Perform the Factory Reset:
Follow the instructions from your printer’s manual carefully to perform the factory reset. The steps can vary depending on your printer model, but it typically involve a combination of button presses or menu selections on the printer’s control panel.
- Confirm the Reset:
After initiating the reset, your printer may display a confirmation prompt. Please verify that you wish to continue with the reset. This action will erase any custom settings and return the printer to its default configuration.
- Wait for the Reset:
The resetting procedure might require a few minutes to finish. During this time, your printer will revert to its original settings.
- Power On the Printer:
Once the reset is finished, power on your printer. It will begin using the initial configuration.
- Reconfigure Your Printer:
After the factory reset, you’ll need to reconfigure your printer as if you were setting it up for the first time. This includes connecting it to your Wi-Fi network (if applicable) and installing any necessary drivers on your computer.
- Test a Print Job:
Print a test page or document to ensure that the “Filter Failed” error is no longer present. If the error is resolved, you should be able to print without any issues.
Therefore, Before you reset your printer, know that it will erase any special settings you’ve made. So, make sure to save any important settings before you start.
If you need help with how to do the reset or face problems, it’s a good idea to get in touch with Canon customer support. They can help you based on the type of printer you have.
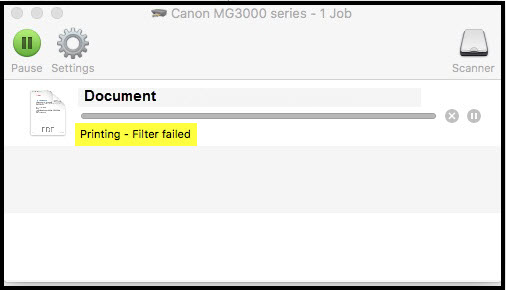
How to fix the “Filter Failed” error when printing on macOS? – Additional Stuff!
1. Restart your printer and Mac.
2. Update your printer drivers from the manufacturer’s website.
3. Check and ensure a stable printer connection.
4. Clear the print queue by deleting pending jobs.
5. If the issue persists, reset the printing system in “System Preferences.”
6. Verify paper and ink levels in your printer.
7. Keep your macOS updated.
8. Look for conflicts with third-party printer software and remove or disable them.
9. Utilize Apple’s Printer Repair Utility in “System Preferences” > “Printers & Scanners.”
10. If the problem persists, contact your printer manufacturer’s or Apple Support for assistance.
So, Follow these steps, and you’ll quickly resolve the Filter Failed error on macOS. Click the website link to discover the solution and resume printing your documents without any trouble.
Frequently Asked Questions:
1. Why Won’t My Chromebook Print to an HP Printer?
If your Chromebook is having trouble printing to an HP printer, it’s essential to ensure that your HP printer driver is updated and compatible with your Chromebook’s operating system.
2. Why is it important to check for paper jams or low ink levels?
Paper jams or low ink levels can obstruct the printing process, triggering the “Filter Failed” error. Checking for and resolving these issues is essential for smooth printing.
3. How do I update the printer drivers on my Canon printer?
To update printer drivers on your Canon printer, visit the official Canon website, locate your printer model, and download the latest drivers compatible with your Chromebook.
4. What is the “Canon Printer Filter Failed Error” on Mac?
The “Canon Printer Filter Failed Error” on Mac is a common issue that occurs when there’s a problem with the printer’s software or settings, causing printing failures.
Conclusion:
Canon printer Filter Failed problems can happen if your document is too big, your printer is basic, the drivers don’t match, or there are software issues. Just keep your drivers updated, set things right, and reach out to Canon if needed.
So, If you have problems or need help, don’t hesitate to read this article. They can give you specialized advice for your printer model. Happy printing!